Monday 29 November 2010

Cast parts pinned together

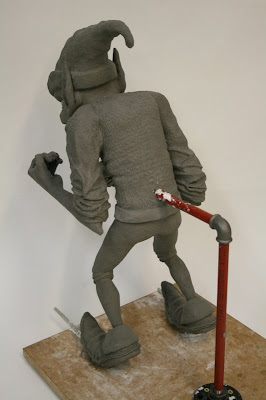
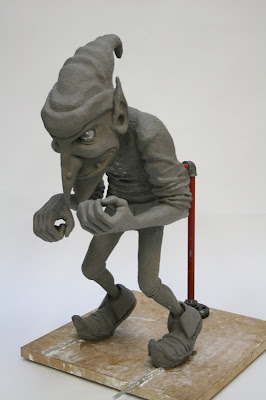
I have started to fill in any discrepancies that didn't quite come out in the casting process with apoxie based magic-sculpt, I prefer this kind of sculpting material over milliput as it is less spongy and works more like a clay. I am also going to use this material to sculpt in the garment around the hobgoblins shoulders as well as the coat tails around the tops of his legs. The texture of his socks didnt quite come out in the cast so I have also added a thin layer of magic-sculpt around them and re-textured them.

I have pinned all of the cast parts together using some 5mm brass rod that I had left over from another project. The rod will provide additional strength to all the joints in case the Hobgoblin is knocked and the glue fails. The rods will also help by holding the parts when they are being glued together.


Saturday 27 November 2010

Arms successfully Cast

The head has been cast successfully, there is a small difference at the back of the head where the seam line is, however this can be blended with some apoxie magic-sculpt. There were some parts of the cast where the wall thickness was a little thin so I poured some more resin into the head and swilled it around to make sure it was covered adequately.

The silicone jacket worked for the arms however it didnt quite work the way that I wanted with both hands and there was resin in the hole between the finger and thumb where he is holding the axe. This can be cleaned up before painting.


Friday 26 November 2010

Casting

I have opted to hollowcast the Hobgoblin in fast cast resin. The cure time for each layer will be approximately 20 mins, with 2 or 3 layers to create the thickness required for each part. The final layer I will need to wait until the cast has cooled before demoulding as fast cast resin is still soft when its warm.

Monday 22 November 2010

Silicone Moulding

The silicone jacket I am making around the sculpt will be one part with a cut down the back, and then the cut splits off down the backs of the thighs and calf muscles and down the backs of the shoes. This will allow me to keep the seam lines to a minimum with the potential if there are any to not be at the front of the figure.

Body and Legs-

I have opted to bulk out the silicone to remove all the undercuts around the shoes and knees to change the original plan for a six part fibreglass jacket into a two part jacket.

Head-

With the head I plan to make a one part silicone jacket and cut the head out down the back of the hat and then down the back of the head and under the chin. This will avoid a seam line down the front of the face.

Arms-

I intend to mass out the silicone jacket removing the undercuts to allow for a two part fibreglass jacket on each of the arms.

Thursday 18 November 2010

Moulding Process

I have broken down the sculpt into its component parts ready for moulding. I poured a layer of silicone over each of the parts so that all the detail is picked up. I worked the silicone into all the areas to avoid air locks with a paint brush.


Thursday 11 November 2010

Sculpt pics

I have taken some pictures of the sculpt before I mould it.


Wednesday 10 November 2010

Latest Pics

I have spent most of the day tidying up the sculpt, polishing away the fingerprints with lighter fluid and a coarse brush so I can then start to add the various textures of the clothing and skin texture.


Sculpting the other sleeve

The method for creating the folds which worked for me was the extrusion using a clay gun of clay sausages which were then added onto the sleeves, these were then blended into each other to create the flowing forms of the clothing folds.

Tuesday 9 November 2010

Sculpting the folds in the sleeve

I have spent today working on the folds of the sleeve of the Hobgoblins arm, I previously had them roughed in however this wasn't really working for me.


I opted to mock up an arm and drape the sleeve of a jumper over it which provided me with accurate reference from which to sculpt the folds on the Hobgoblin.

I spent most of today detailing them and refining them after 3 attempts I was finally happy with what I had achieved on the last attempt.


Monday 8 November 2010

Working into the face

I was unhappy with the overall form of the face at the end of last week, I felt that what I had sculpted lacked form and shape, for example around the cheek and creases where the cheek bunches up when someone is smirking. I spoke to one of our visiting lecturers this morning about my progress and for him to critique my work.

His criticism was that I needed to form the jaw and make it more pronounced than it was at the moment. It was at this point that I decided to take the Hobgoblin by the scruff of the neck and develop the facial anatomy more to give the face more form. I felt that whilst I had a good likeness it lacked punch in terms of detailing. I built up the cheeks and the folds of skin around the corners of the mouth where he is smirking.


He also highlighted what I have been aware of whilst sculpting the Hobgoblin- due to him standing on his tip toes whilst he is sneaking and the weight of the pose being forward as well as the the size and weight of the head it will be difficult to balance the statue without putting stress on the weak points of the legs- the ankles and knees. When I cast the Hobgoblin I intend to cast in a steel structure which will provide reinforcing for the ankles and knees. I also intend to weld a bolt onto each leg steel which I can then tighten a nut onto so that the Hobgoblin is bolted down securely. This should relieve the stress on the resin so that cracking is avoided.

Sunday 7 November 2010

General Progress Update

Overall I am happy with my progress however I am conscious of finishing the sculpt this week to allow myself enough time to mould and cast the final statue that I am going to paint. So for that reason I intend to do a full review where I am currently at, and work into the photographs I have taken on Friday to finalist the details and form, I feel it is important to do an action/time plan for the week ahead to make sure I don't miss the sculpting deadline I have set myself. I have a good couple of days workin on the texturing and finalising the detailing so I need to allow myself enough time to do that to finish the sculpt off, thinks like texturing the clothing he is wearing, texturing the skin on his head, and giving him more detail around the eyes. I think I will be putting in some long hours this week and throwing everything I have to make sure the sculpture is completed by the deadline I have set.

The pictures I have taken below provide me with a record of what I have and what I need to achieve within the next week. I can also use these pictures to draw into and overlay some anatomy reference to make sure everything looks ok.


Friday 5 November 2010

Jacket folds

I have sculpted some of the folds on the upper right arm, folds are always difficult to get right, because of this I have taken some reference pictures. I am still debating whether to stick accurately to the folds on the artwork as they do look realistic, or to make to folds completely different based on the reference pictures, as I can see how they follow the form of the arm all the way around.

Shoes

The hobgoblin artwork doesn't show the shoes so I have sculpted what I think they look like. I have added in some folds to provide some detail, going by the coat that he is wearing there may well be laces on the shoes. The small bag he is carrying on his bag shows some seam stitching so I intend to apply the same detailing to his shoes. The quivver also appears to be made of cloth so this again will feature some stitched detail.


Thursday 4 November 2010

Leg anatomy... aaaaargh

I have worked on the leg anatomy today, whilst the hobgoblin is very thin on the artwork, he would still have leg muscles which are quite defined, all be it they aren't very muscular.

I have used various books about anatomy to look at the leg muscle structure. I am not completely happy with them, but what I have done is a good foundation to build on. The thighs are not seen, however their form will define the bottom of the coat which drapes around them so it is important that I have the right form.


Tuesday 2 November 2010

Roughing in the hands

Once the armature for the hands was made I began to rough out the forearm and hand. With the wire acting as the skeleton of the fingers it made it much easier to pose the fingers correctly and at a correct spacing to then be fleshed out with clay. As the forearm was removable it also made it much easier for working on them rather than whilst they were on the main figure.

The wire structure also made it easier to repose the fingers if I wasnt happy with their position. I sliced between them with a blade shaped sculpting tool and then moved them to the position I required.


Monday 1 November 2010

Removable Arms

After discussions with David Goode about my armature and the number of parts I would need to sculpt it in both to make the sculpting process easier and to ensure that I could mould and cast it easily I opted to make the arms in two parts. This required some retrospective cutting up of the armature. With the use of aluminium armature wire for the bones of the hand through to the fingers as a real persons hand is, it ensured that the width was correct as well as the position of the fingers.

The armature wire running through the hand and fingers also ensured that should I need to resposition their position then this was fairly easy. It also ensured that the clay had a firm structure running through it which would aid the moulding process.